
clean furniture
A charming antique furniture piece caught your eye and convinced you to bring it home. Now what? Sure, it looks a little rough around the edges, but you’re not opposed to putting in some elbow grease either to make it look good as new. But if this is your first time restoring a piece of antique furniture, where do you even start? Here are 12 antique furniture restoration tips for beginners.
1. Inspect for Damage
When you find a bargain furniture piece at a second-hand store, it might be for a good reason. Before you bring it home, inspect it for any signs of damage. Is the hardware all there? If there are missing drawer handles or hinges, this is easily fixable. You can find lots of replica period-style furniture hardware to replace them. Give the furniture a good, hardy shake to see how stable the furniture legs are. If there’s a loose leg, decide if it’s worth your time fixing. While possible, depending on the level of damage, it might not be a great project for a beginner.
2. Set Up the Project in a Well-Ventilated Area

furniture restoration
When you bring home your antique furniture piece, you’ll need to designate a space to fix it up. However, keep in mind that you’ll be working with stains, varnishes and paints, which require ventilation – not to mention the overall mess of scraped-off paint chips and the fine particles from sanding. Keeping this all in mind, the best place to restore your piece would be an open-air garage space or an outdoor patio space. This way, you can breathe easier!
3. Apply a Thick Coat of Stripper
To remove the original layer of stain or paint from the antique furniture piece, you will need to use a coat of stripper. And not just any coat – a thick coat! Pour the stripping gel into a shallow pan and, taking a chip brush, apply it to the furniture. Test an area to see how quickly or easily it removes the paint (you should see it bubbling up). You will need 20 minutes at a minimum, but for heavier coats of paint, it could take up to 24 hours. Still, try a 20-minute test first to get a gauge of the overall time.
4. Use a Plastic Scraper
When you do remove and scrape off the paint or stain, always use a plastic scraper. Should you use a metal scraper, you could ruin your newly upcycled DIY project. Metal scrapers are stronger, but this means they can gouge the wood and damage the piece.
5. Scrub Off Residue with Mineral Spirits and Steel Wool
After you scrape off the original paint or stain, you might still have some leftover residue. To remove it, put mineral spirits on a steel wool pad and scrub. This should eliminate the last remnants so you can sand easier, which will help you apply a fresh coat of paint or stain.
6. Try the Toothpick Trick
Another tip for restoring antique furniture? Using toothpicks! While a plastic scraper and mineral spirits-doused steel wool can remove most of the existing finish or paint, they can’t reach smaller areas and crevices, especially those around hardware. Ideally, you should remove hardware, but occasionally, this can prove a little tricky, especially if you don’t necessarily want to reassemble the furniture piece. In these cases, you can use a toothpick to remove stripping gel from holes or other particles that get lodged.
7. Sand Using Various Grits
After you scrape off the existing paint or stain and before you begin sanding, you need to prepare the wood. But don’t just start with any old piece of sandpaper. Instead, be sure to use various grits. Begin with rougher sandpaper with 100 grit, gradually moving into a medium 120 grit and finally a finer 180 grit. This will ensure your furniture is prepped to take on latex paint or new stain, which will adhere well and blend smoothly.
8. Choose a Dark Stain to Conceal Blemishes

dark paint furniture
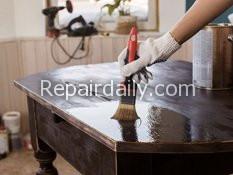
More than likely, the antique furniture piece you picked up at the thrift store will have a few blemishes. From water rings to burn marks, things happen. Sometimes, this adds character, but other times, the flaws just make the piece appear unkempt. So as a good rule of thumb, if you want to cover the blemishes, you’ll need to choose a dark-colored stain or finish. Ebony or dark brown will work wonderfully!
9. Give Your Paint or Stain Plenty of Time to Dry
Don’t rush your restoration project! Once you apply a new stain or paint it the color you want, give it plenty of time to dry – especially between coats! It also helps to apply stain or paint on a day with low humidity, as high humidity can slow down the drying process. So check the weather and aim to do this step on a day with 50 to 70 percent humidity or set up a dehumidifier in your garage or DIY workstation.
10. Elevate the Furniture Piece
Make sure to elevate your piece as you stain it! Otherwise, you’ll find the stain puddling at the tips of the feet, base or legs. Propping the piece on top of a table also allows for ample air flow, drying the stain faster. Be mindful when you elevate furniture pieces, making sure they’re stable and secure. The last thing you want is it tipping over and ruining your time-consuming stain job!
11. Add a Drop Cloth or Ground Cloth
No matter where you decide to complete your furniture restoration project, protect the area with a drop cloth or ground cloth while you apply the stain. The last thing you want is to splatter or spill a dark stain across your garage floors. Even if you take your furniture piece outside in the backyard or patio, a drop cloth or ground covering of some sort will protect your grass.
12. Gather the Correct Supplies
Now that you know what goes into restoring a furniture piece, make sure to gather the correct supplies before starting your DIY project. Here is a more specific list of the items touched on above:
- Paint stripper or gel
- Chip brush
- Plastic scraper
- Refinishing Gloves
- Mineral spirits
- Steel wool pads (fine wool)
- Sandpaper (100, 120 and 180 grit)
- Palm sander
- Wood stain
