Do you know How To Join Two Pieces of Wood at 90 Degrees? Are you tired of struggling to join two pieces of wood at a perfect 90 degrees angle? Look no further! In this ultimate guide, we will show you exactly how to join wood like a pro, ensuring a seamless and sturdy connection every time.
Whether you’re a woodworking enthusiast or a professional carpenter, mastering the art of joining wood at 90 degrees is essential. It’s the foundation for building furniture, cabinets, and countless other projects. And with our expert tips and techniques, you’ll be able to achieve precise, professional results.
From traditional joinery methods like mortise and tenon, dowels, and biscuits, to modern solutions like pocket screws and specialized hardware, we’ll cover a range of options to suit your needs. We’ll also provide step-by-step instructions, insightful tips, and safety recommendations to ensure your success.
Joining wood at 90 degrees doesn’t have to be a challenge. With our ultimate guide, you’ll gain the knowledge and confidence to tackle any woodworking project with ease. Let’s get started and take your woodworking skills to the next level!
Tools and materials needed for joining wood at 90 degrees
Before we dive into the different techniques on How To Join Two Pieces of Wood at 90 Degrees, let’s go over the essential tools and materials you’ll need for the job. Having the right equipment is crucial for achieving a precise and secure connection.
- Measuring tools: Accurate measurements are vital when joining wood at 90 degrees. Make sure you have a reliable tape measure, a combination square, and a marking gauge to ensure your cuts are precise.
- Cutting tools: To create clean and accurate joints, you’ll need a quality saw. A miter saw or a table saw with a miter gauge will allow you to make accurate 90-degree cuts. A chisel and a mallet will also come in handy for fine-tuning the joints.
- Joinery tools: Depending on the technique you choose, you may need additional tools. For example, if you opt for dowel joinery, you’ll need a doweling jig and a drill. If you’re using pocket screws, a pocket hole jig and a drill will be necessary.
- Clamps: Clamps are essential for holding the pieces together while the glue dries. Consider having a variety of clamps in different sizes and types to accommodate various projects.
- Wood glue: A high-quality wood glue will ensure a strong and durable bond between the two pieces of wood. Look for a glue specifically designed for woodworking projects.
Now that you have the necessary tools and materials, let’s explore the different methods for joining wood at 90 degrees.

Common Methods To Be Used – How To Join Two Pieces of Wood at 90 Degrees
There are several traditional and modern techniques for joining wood at 90 degrees. Each method has its advantages and is suited for different types of projects. Let’s take a closer look at some of the most popular methods:
Butt joint technique
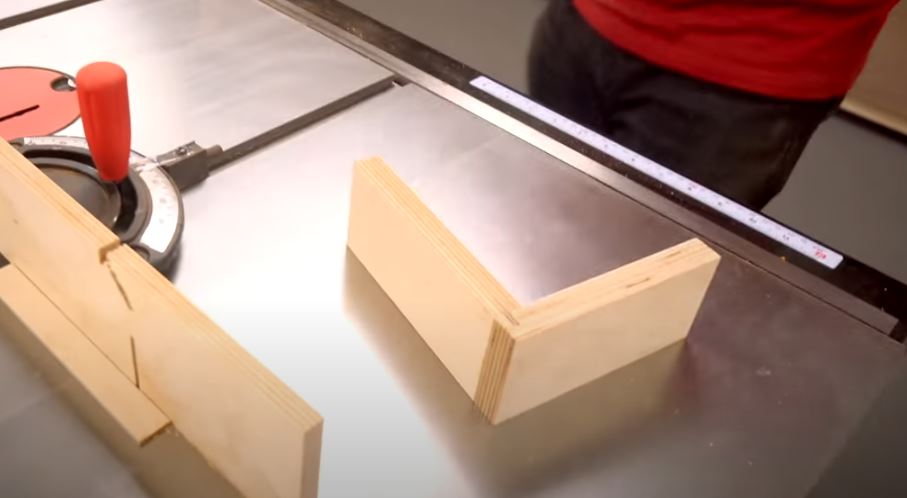
The butt joint is one of the simplest and most common methods for joining wood at 90 degrees. It involves joining the end grain of one piece of wood to the face grain of another piece. While it may not be the strongest joint, it can be reinforced with screws, dowels, or biscuits for added strength.
To create a butt joint, start by ensuring that both pieces of wood are cut to the desired length. Use a miter saw or a table saw with a miter gauge to make accurate 90-degree cuts. Apply wood glue to the end grain of one piece and press it against the face grain of the other piece. Clamp the pieces together and let the glue dry according to the manufacturer’s instructions.
For added strength, you can reinforce the butt joint with screws. Pre-drill pilot holes to prevent splitting and then drive screws through one piece of wood and into the other. Alternatively, you can use dowels or biscuits to align and reinforce the joint.
The butt joint technique is best suited for projects where appearance is not a primary concern, such as framing or structural applications.
Pocket hole joinery technique
Pocket hole joinery is a modern and versatile method for joining wood at 90 degrees. It involves drilling angled holes, known as pocket holes, into one piece of wood and then joining it to another piece using screws.
To create a pocket hole joint, you’ll need a pocket hole jig and a drill. The jig guides the drill bit at the correct angle and depth to create the pocket hole. Start by setting up the jig according to the manufacturer’s instructions. Clamp the jig to the workpiece and drill the pocket holes.
Next, apply wood glue to the edge or face of the second piece of wood and position it against the first piece, aligning the pocket holes. Insert screws through the pocket holes and tighten them with a screwdriver or a drill. The screws pull the two pieces together, creating a strong and secure joint.
Pocket hole joinery is popular for its ease of use and strength. It’s ideal for a wide range of projects, including cabinets, furniture, and frames.
Dowel joinery technique
Dowel joinery is a traditional method that involves using small wooden dowels to join two pieces of wood together. The dowels act as alignment pins and provide additional strength to the joint.
To create a dowel joint, start by marking the desired location of the dowels on both pieces of wood. Use a doweling jig to guide the drill bit at the correct angle and depth. Drill holes into both pieces of wood, ensuring that the holes line up accurately.
Apply wood glue to the dowels and insert them into one piece of wood. Then, join the two pieces together, ensuring that the dowels fit snugly into the holes. Clamp the pieces together and let the glue dry. Once the glue is dry, you can trim the dowels flush with the surface of the wood.
Dowel joinery provides excellent alignment and strength. It’s commonly used in furniture making and other projects where appearance and durability are important.
Biscuit joinery technique
Biscuit joinery is a method that involves using small, football-shaped wooden biscuits to align and reinforce the joint between two pieces of wood. Biscuits are inserted into slots that are cut into the edges of the wood, creating a strong and precise connection.

To create a biscuit joint, start by marking the location of the biscuits on both pieces of wood. Use a biscuit joiner, also known as a plate joiner, to cut slots into the wood at the marked locations. Apply wood glue to the biscuits and insert them into the slots of one piece of wood. Then, join the two pieces together, ensuring that the biscuits align.
Clamp the pieces together and let the glue dry. Once the glue is dry, you can trim any excess biscuit material and sand the joint for a smooth finish.
Biscuit joinery is commonly used in cabinetmaking, tabletops, and other projects where alignment and strength are crucial. Let’s continue reading about How To Join Two Pieces of Wood at 90 Degrees.
Mortise and tenon joinery technique
Mortise and tenon joinery is a traditional method that provides exceptional strength and durability. It involves creating a rectangular hole, known as a mortise, in one piece of wood and a corresponding projection, known as a tenon, on the other piece. The tenon is then inserted into the mortise and secured with glue or wooden pegs.
To create a mortise and tenon joint, start by marking the location of the mortise and tenon on the respective pieces of wood. Use a chisel and a mallet to carefully remove the material within the marked area to create the mortise. Ensure that the mortise is slightly deeper than the length of the tenon.
Next, shape the tenon on the corresponding piece of wood to fit snugly into the mortise. Test the fit and make any necessary adjustments.
Apply wood glue to the tenon and insert it into the mortise. Clamp the pieces together and let the glue dry. For added strength, you can also drive wooden pegs through the joint.
Mortise and tenon joinery are commonly used in high-quality furniture, doors, and other projects where strength and aesthetics are paramount.
Tips for achieving a professional finish when joining wood at 90 degrees
Achieving a professional finish when joining wood at 90 degrees takes practice and attention to detail. Here are some tips to help you achieve excellent results:
- Plan and measure carefully: Take the time to plan your project and measure accurately. Double-check your measurements before making any cuts to avoid costly mistakes.
- Use sharp cutting tools: Sharp cutting tools will make clean and accurate cuts, resulting in a better joint. Regularly sharpen your saw blades and chisels to maintain their cutting performance.
- Practice proper technique: Whether you’re using a saw, drill, or chisel, practice proper technique to ensure safety and accuracy. Take your time and make controlled, steady movements.
- Test fit before gluing: Before applying glue, test the fit of your joint to ensure that everything aligns correctly. Make any necessary adjustments before proceeding.
- Apply even pressure when clamping: When clamping the pieces together, apply even pressure to ensure a tight and secure bond. Use clamps in multiple locations to distribute the pressure evenly.
- Clean excess glue: Wipe off any excess glue immediately with a damp cloth. Removing excess glue before it dries will make the finishing process easier and prevent unsightly glue stains.
- Sand and finish the joint: Once the glue is dry, sand the joint to remove any rough edges or imperfections. Apply a finish or stain to match the surrounding wood and protect the joint.
By following these tips and practicing your woodworking skills, you’ll be able to achieve professional-looking joints every time.
YouTube Video | 10 Best Methods How To Join Two Pieces of Wood at 90 Degrees Like a Pro
Conclusion and final thoughts
Joining wood at 90 degrees is a fundamental skill in woodworking. With the right tools, techniques, and attention to detail, you can create strong and seamless connections between two pieces of wood.
In this ultimate guide, we explored various methods for joining wood at 90 degrees, including butt joints, pocket hole joinery, dowel joinery, biscuit joinery, and mortise and tenon joinery. Each method has its advantages and is suited for different types of projects. By understanding their strengths and limitations, you can choose the method that best suits your needs.
Remember to plan carefully, measure accurately, and practice proper technique when joining wood at 90 degrees. Take your time, be patient, and focus on achieving precise and secure connections. With practice and experience, you’ll be able to join wood like a pro and create impressive woodworking projects.
So, why wait? Grab your tools, follow our guide, and take your woodworking skills to the next level. Happy woodworking!
I'm so excited to tackle all my home improvement projects! From plumbing to DIY and cleaning - I'm ready to get down to work! #homerepair #homecleaning #plumbing #diy #fixerupper #realestate #renovation #interiordesign #farmhouse #diy #homedecor #hgtv #home #farmhousedecor #modernfarmhouse #farmhousestyle #fixerupperstyle #fixandflip #homerenovation #realestateinvesting #beforeandafter #homesweethome #remodel #realestateinvestor #interior #realtor #joannagaines #flippinghouses #countryliving #design #homedesign #farmhouseinspired #investmentproperty #bhghome #renovationproject #farmhousekitchen #homeimprovement #farmhouseliving #cottagestyle #decor #realestateagent #magnoliahome #homeinspo #magnoliamarket #kitchendesign #dreamhome #shiplap #construction #houseflipping #investor #farmhousedesign #architecture #farmhousechic #homereno #rusticdecor #reno #kitchenremodel #webuyhouses #magnoliatable #rentalproperty #fixerupperinspired #newhome #interiors #homeremodel

